Expand Rows Using Data Input Table
If your plan value is stored on a bigger combination of keys than one or two (non Aimplan keys), creating a checkbox in a Planning & Reporting Table might not be a sufficient solution as the number of rows are ruled through the Row Sections, creating a Matrix Hierarchy that would have several levels.
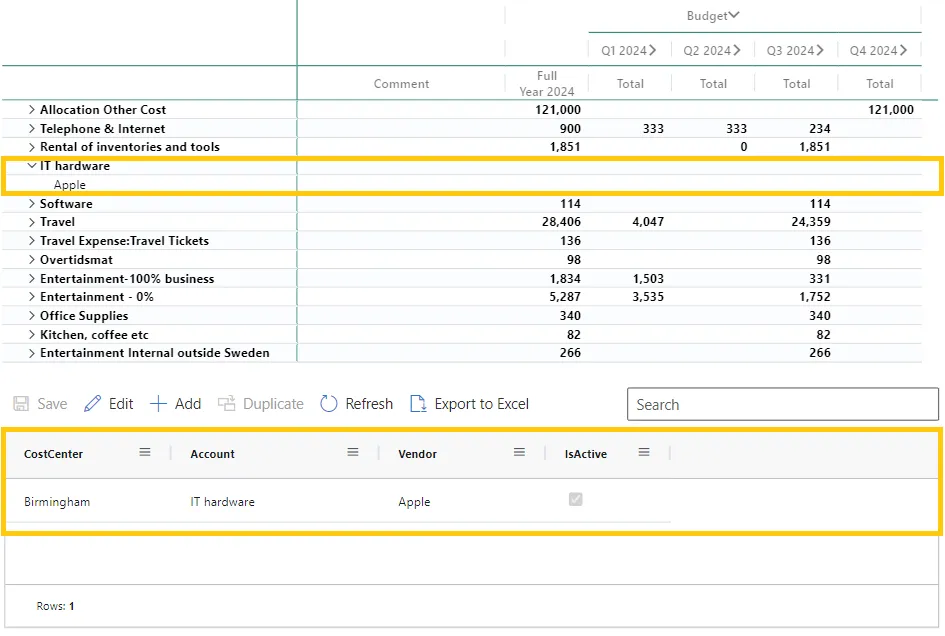
You might then consider adding new rows, as transactions, creating unique combinations of your dimension keys in a Data Input Table.
To do this, you need to create an Other table in the Portal and set up the keys that you want to store values on. In our case, we want to add combinations of OrgKey, AccountKey and VendorKey and a check box to rule whether the combination should be active or not. Read more about how to set up your Data Input Table here.
Note! Here you need to consider if you want your combinations to be related to a specific scenario (in that case you need to add the ScenarioKey as a column in your table), if you want to be able to Activate/Disactivate certain combinations (Create a Bit column in your table) or have any other dimensions that you want to rule your "expansion transactions".
When you have created your Other table in the Portal, add it to your Power BI model and set active many-to-one relationships to each key-column's corresponding dimension table.
You can now set up your Aimplan Data Input Table Visual and start entering new rows by clicking Add. Remember to use Dynamic Dropdown Fields on your columns so that the user do not write in faulty values! When you do this, you might have to create a calculated table to get your distinct dimensions stored on a common dummy value, not to create a cross-join with your dropdown fields, read more about how to do that here.
You now have to create a measure that generates a value for each of the rows in your Data Input Table that should be included in the visual. If you use a check box, it could look like this:
Reference this value in to the Aimplan User Key-measure that you are using in your Planning & Reporting Visual:
You should now be able to see your added rows in your Planning & Reporting Visual:
